5 Tutorial:
Using the Database Kit
This chapter contains a tutorial that guides you through the process of using the Database Kit. This tutorial assumes you have successfully installed AVS/Express and linked to the Database Kit. You must have a valid license for AVS/Express, including the Database Kit. For details see Installing AVS/Express in the AVS/Express document set.
Using the Oracle database as an example, this chapter describes the following procedures:
- Start AVS/Express
- Connect to Your Database
- Set up the Sample Database Table
- Extract the Data from the SALES1 Database Table
- Bring the Data into the 3D Viewer
- Clean Up
- UNIX systems - Set your DISPLAY and PATH environment variables, then start AVS/Express in the foreground. In the set path command, <install-dir> is the AVS/Express installation directory and <platform> is the machine platform (alpha, hp, ibm, sgi, sg6, sun, or s2). In the second setenv command <database_name> is the environmental variable name (ORACLE_HOME) for the location of the database you are using, and <database_dir> is the source directory of the database you are using.
setenv DISPLAY your_workstation_name:0
setenv <database_name> <database_dir>
set path = ($path <install-dir>/express/bin/<platform>)
express
- You start AVS/Express in the foreground because AVS/Express' V Command Processor (VCP) uses the shell window. The VCP is a command interface to AVS/Express. You will learn more about the VCP later.
- Windows - Open a command shell, navigate to the express directory, then start AVS/Express with the following command:
After you start AVS/Express, perform the following steps:
1. Notice the V Command Processor (VCP) that appears. On UNIX systems, it appears in the shell window where you started AVS/Express. On Windows systems, a new command shell appears containing the VCP. Here is the VCP prompt:
- You do not need to do anything with the VCP.
- You use the Network Editor to create objects and applications.
3. Select "Application" from the "Choose initial application type" dialog box, or select "Module Stack" from the same menu and go directly to Selection 5. Although you could get to it in other ways for the purposes of this tutorial do it this way.
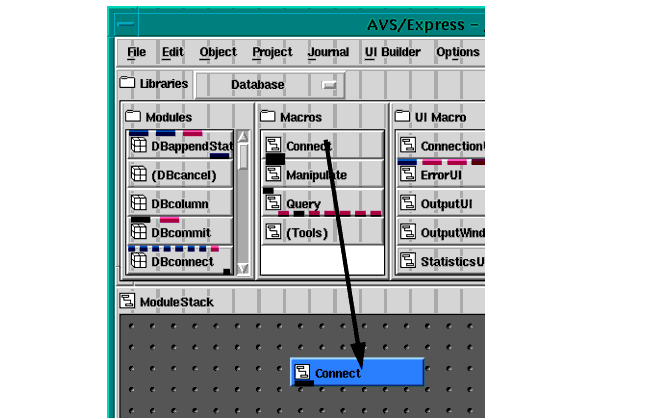
5. A window called Module Stack appears to the left side of the Network Editor. Although the Module Stack window is currently empty, it is through this window that you access the user interface for visualization objects. For example, Read_Field, one of the visualization objects you will be using in this tutorial, reads an AVS/Express field data file. The user interface for Read Field is a file selection dialog, which you will access through the Module Stack window.
- When you instance the Connect module, AVS/Express displays the Connect interface:
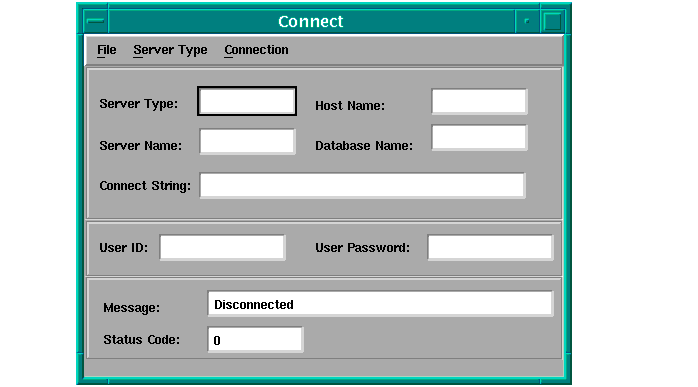
- At a minimum you must supply the server type and the connect string.
- When AVS/Express makes the connection, the Message field changes to "Connected."
For more information about how to connect to a database, see Using the Connect Interface2-2.
In this step we create a simple table, SALES 1, to use for this example, using the Oracle database. The following steps describe how to use the AVS/Express Manipulate macro to create the table. If you prefer you can enter the commands into your Oracle database using SQL*Plus or another database utility program.
- AVS/Express displays the Manipulate interface:
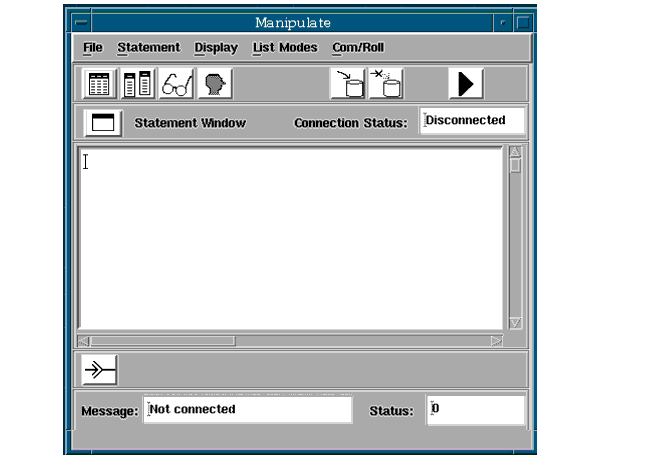
2. In the Network Editor workspace, connect the Connect macro to the Manipulate macro. Your network should look something like the following:

- When you connect the macros, the Connection Status and Message fields in the Manipulate interface change to "Connected."
3. Create the table by entering the following command into the Statement Window in the Manipulate interface:
- create table SALES1
(YEAR VARCHAR(4),
QUARTER NUMBER(1),
SALES NUMBER
)6. Insert the data into the table by entering each of the following commands in turn into the Statement Window and pressing the Process tool after each one:
- insert into SALES1 values ('1994',1,10)
insert into SALES1 values ('1994',2,12)
insert into SALES1 values ('1994',3,10)
insert into SALES1 values ('1994',4,16)
insert into SALES1 values ('1995',1,12)
insert into SALES1 values ('1995',2,14)
insert into SALES1 values ('1995',3,11)
insert into SALES1 values ('1995',4,20)
- Note: You do not need to clear the window after each statement. You can enter the first command, press Process, edit the current command to produce the next one, press Process again, and so on.
In this section you will use the Query module to extract the data from the SALES1 database table.
1. Instance the Query macro from the Database library into the workspace and connect it to the Connect macro.
- You network should look something like the following:

- When you instance Query, AVS/Express displays the Query interface:
- AVS/Express displays a list of the tables in your database. Scroll the list, if necessary, to find SALES1.
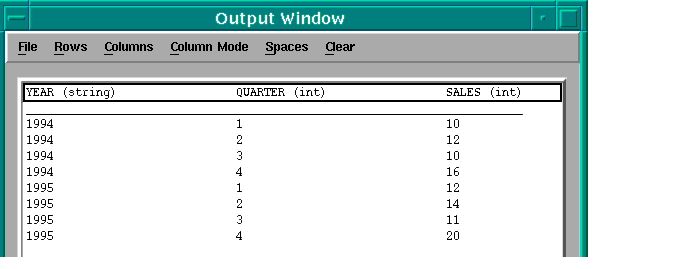
4. In the Query interface, Open the output window by selecting the Output Window command from the Display menu.
- select * from SALES1 (return)
- The data in SALES1 appears in the Output Window:
In this section you will instance the modules needed to visualize the data, connect the module, and display the data.
2. Instance the Main.Mappers.Table_to_Uniform_Field object and connect it to the Query module as shown below.


- The Module Stack displays the interface for the Table to Uniform Field macro.
6. Still within the "Modules" menu, under "Field Data", toggle the Count Records button to OFF and scroll down the list to select SALES from the menu.
7. In the Network Editor, change to the Visualization library by selecting it from the Libraries pull-down list, and instance the Axis3D object. Axis 3D is in the Geometries sublibrary.
8. Change to the Main library and instance the city_plot and Viewer3D objects. City_plot is in the Mappers sublibrary. Viewer3D is in the Viewers sublibrary.
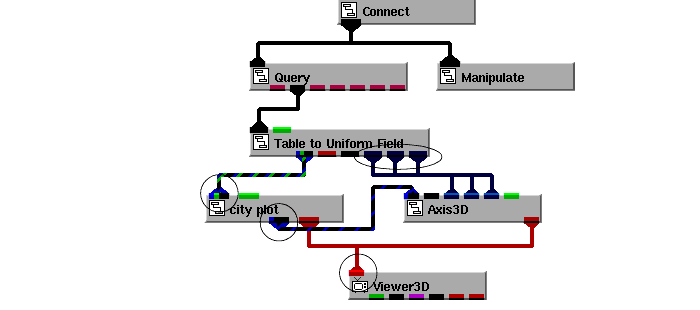
- You will see the city_plot visualization appear in the 3D Viewer. You can use the Left Button pop-up button in the Viewer to interactively rotate (Rotate), scale up or down (Scale), or reposition (Translate) the image.
14. In the Module Stack "Modules" menu, select city_plot. Use the height scale slider to adjust the height of the 3D bars in the 3D Viewer.