The second icon button in
the Selection / Navigation Window can be used to set the mode to Navigation
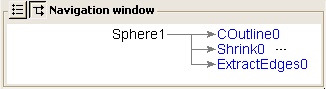
Window. In the image on the right you can see that this button, which
looks like a small graph diagram, is depressed and the title of the window
is Navigation window. A graphical representation of the portion of the
pipeline diagram directly connected to the selected item will be displayed.
In the example, we have a sphere source to which three filters were applied.
The Sphere1 item is shown in black which indicates that it is the currently
active item. The three objects connected to the output of the sphere source
are shown in blue, indicating that you
can click on the item to make it the currently active object and to redraw
the graph starting from this object. For example, clicking on the Shrink0
item in the above example leads to the pipeline diagram shown on the right. In this diagram we can see that the Shrink0 item gets its
input from the Sphere1 source, and the output of the shrink filter is
the input to ExtractEdges1. Since three dots are used to indicate a continuation
of the pipeline past the one item shown on either side, we can tell that
Sphere1 is the beginning of this pipeline and ExtractEdges1 is the end
of this pipeline since there are no dots. In the top example, note that
there are dots after Shrink0 indicating a continuation.
Note that it is possible to get to any
item using the Navigation Window, but it may require many steps since
you can only move forward or backward one step in the pipeline at a time.
For example, if Shrink0 is the active item as it is in the example above,
then to make ExtractEdges1 the active item we would need to click on Sphere1
to go back a step, then click on ExtractEdges0 to go forward a step. Alternatively,
you can toggle the mode to Selection Window, click on ExtractEdges1, then
toggle the mode back to Navigation Window.
 The second icon button in
the Selection / Navigation Window can be used to set the mode to Navigation
Window. In the image on the right you can see that this button, which
looks like a small graph diagram, is depressed and the title of the window
is Navigation window. A graphical representation of the portion of the
pipeline diagram directly connected to the selected item will be displayed.
In the example, we have a sphere source to which three filters were applied.
The Sphere1 item is shown in black which indicates that it is the currently
active item. The three objects connected to the output of the sphere source
are shown in blue, indicating that you
can click on the item to make it the currently active object and to redraw
the graph starting from this object. For example, clicking on the Shrink0
item in the above example leads to the pipeline diagram shown on the right.
The second icon button in
the Selection / Navigation Window can be used to set the mode to Navigation
Window. In the image on the right you can see that this button, which
looks like a small graph diagram, is depressed and the title of the window
is Navigation window. A graphical representation of the portion of the
pipeline diagram directly connected to the selected item will be displayed.
In the example, we have a sphere source to which three filters were applied.
The Sphere1 item is shown in black which indicates that it is the currently
active item. The three objects connected to the output of the sphere source
are shown in blue, indicating that you
can click on the item to make it the currently active object and to redraw
the graph starting from this object. For example, clicking on the Shrink0
item in the above example leads to the pipeline diagram shown on the right. In this diagram we can see that the Shrink0 item gets its
input from the Sphere1 source, and the output of the shrink filter is
the input to ExtractEdges1. Since three dots are used to indicate a continuation
of the pipeline past the one item shown on either side, we can tell that
Sphere1 is the beginning of this pipeline and ExtractEdges1 is the end
of this pipeline since there are no dots. In the top example, note that
there are dots after Shrink0 indicating a continuation.
In this diagram we can see that the Shrink0 item gets its
input from the Sphere1 source, and the output of the shrink filter is
the input to ExtractEdges1. Since three dots are used to indicate a continuation
of the pipeline past the one item shown on either side, we can tell that
Sphere1 is the beginning of this pipeline and ExtractEdges1 is the end
of this pipeline since there are no dots. In the top example, note that
there are dots after Shrink0 indicating a continuation.