

 |

 |
Draw aregion of interest (ROIdraw)
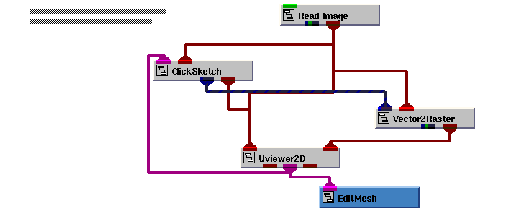
The following example illustrates how to use ClickSketch in a network to draw an ROI on top of an image. The vector ROI that is produced from the ClickSketch module can subsequently be edited with the EditMesh module. The vector ROI is also converted to a raster mask by the Vector2Raster module and then displayed in another view. Typically, this mask would be an input to various image processing routines.

Instance ROIdraw into the empty NE workspace.
This example is found in Libraries.Examples.Graphics_Display. Upon instancing, the example renders an image of the mandrill in one of the viewer's window. The other view has nothing rendered in it initially.
We are now ready to construct a drawing in the view.
Select Editors->Modules to make the modules user interface panel visible. Select ClickSketch from the Modules option menu. This causes the user interface for the ClickSketch module to appear.
By default, the ClickSketch module is set up to draw a polygon. Other primitives that are available are point, line, box, and polygon. In this example, we must use either the box or the polygon primitive since we are drawing a region and it must be closed for proper operation.
Begin building a polygon, using the add point operation.
The mouse operations that control the drawing in the ClickSketch module are:
|
|
|
|
Hold down the Control key and press the right button. This completes the primitive that is in progress. This operation applies only to the polyline and polygon primitives. |
Since you have chosen the polygon primitive, each add point operation adds another point to the polygon. The polygon is terminated and automatically closed with the close operation.
Conversion of screen space primitives into an AVS/Express field.
This example has the ClickSketch module configured so that upon completion of a polygon it is immediately converted into an AVS/Express field. When this happens, the color of the primitives you have drawn on the slice changes from the build color to either the map color, if the Use Map Color toggle is set, or the primary color as specified by the Graphics Display Kit object's properties.
This touches on only a small portion of the capabilities in the ClickSketch module.
Convert the polygons to a raster mask
We can now see the raster mask that has been created from the polygon(s) that have been output from the ClickSketch module in the second view. This mask has been rendered as an image that has two different values, 0 meaning outside and 255 meaning inside. A value of 0 is rendered as blue and a value of 255 is rendered as red.
Select Vector2Raster from the Modules option menu. This causes the user interface for the Vector2Raster module to appear.
Toggle Inside in the Vector2Raster user interface.
By default, Inside was set. This caused the Vector2Raster module to set any pixels inside the polygons to 255 and any values outside the polygons to 0. By toggling Inside, the Vector2Raster module now sets any pixels inside the polygons to 0 and any pixels outside the polygons to 255.
The field that represents this image can be used as input to many of the image processing routines to control which pixels in the image are actually processed.
We are now ready to edit the drawing in the view and observe the effect that the edit has on the raster mask.
Select EditMesh from the Modules option menu. This causes the user interface for the EditMesh module to appear.
By default, the EditMesh is set up to edit a primitive. Points or cells can also be edited.
Select either a point, primitive, or cell to edit from the radio box options at the top of the EditMesh user interface.
Edit the drawing by performing a select/move primitive operation.
The mouse operations that control editing in the EditMesh module are:
|
|
|
|
Press Control left button while the mouse is over a point or line in the drawing. | |
|
Hold down the Control key and drag the primitive while depressing the middle button. |
When the select operation takes place, the point, primitive or cell selected is drawn in the highlight color. The highlight of the point is done with a small rectangle.
When the move primitive operation is in progress, the current position of the updated primitive is echoed in the highlight color. By default, the EditMesh module is configured so when the move primitive operation is completed, the field is updated. This causes the drawing to be rerendered to reflect its new contents.
Points, primitives, and cells may also deleted by clicking on the Delete button after a select operation is done.
Notice that any edit that is performed is immediately reflected in the appearance of the raster mask in the other view.
Delete the ROIdraw application.
 |

 |